How to connect to the Fuga Cloud Object Store
Estimated time to read: 8 minutes
Using the Fuga object storage is a good way to store lots of data in use cases where speed isn’t the most important factor, but scalability is. First, we need some setup.
API keys
- Click on Access tab
- Click on Credentials, and then select the EC2/S3 credentials at the top.
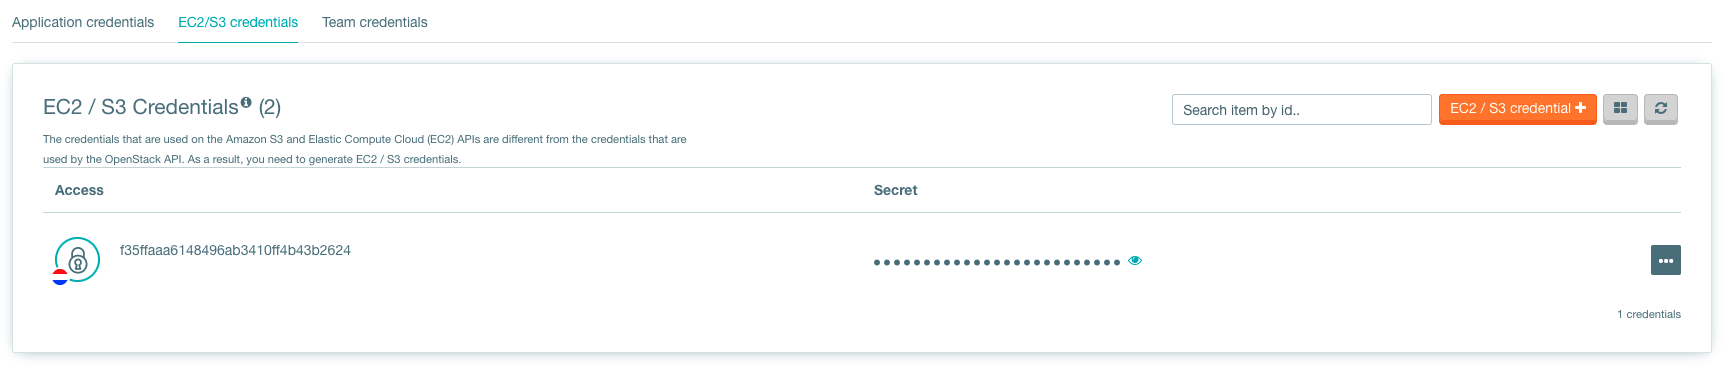
Now you can find the S3 credentials of your current selected environment. At each credential you can find in which region the credentials are deployed.
To create a new S3 credential, click on EC2 / S3 credential.
- To list and create API keys for the Object Store we need the Fuga OpenStack CLI. If you haven’t installed it yet check out our tutorial.
- After following the tutorial for your operating system it’s time to list the credentials. We need the credentials to access our Object Store container in later steps.
- To list all the credentials, enter the command:
openstack ec2 credentials list +--------+--------+------------+---------+ | Access | Secret | Project ID | User ID | +--------+--------+------------+---------+ | 9999.. | 9999.. | 99999999.. | 99999.. | +--------+--------+------------+---------+- If the list of credentials is empty, a new pair of credentials can be generated with:
- Either copy the Access and Secret key to the clipboard or save them temporarily
Creating an Object Store container
- Click on Storage tab
- Click on Create a container and give your new container a fitting name.
Now we can use the Object Store inside the browser, but if we want to use it outside the browser, we need some more setup.
To create a new bucket:
To list your buckets:
$ openstack container list
+------------------+
| Name             |
+------------------+
| my-bucket        |
+------------------+
Now you have created a new bucket with the CLI tools, this one is usable with S3 and Swift.
To install AWS CLI we can use:
Then the next step is to configure the AWS CLI:
$ aws configure --profile=fuga
AWS Access Key ID     [None]: <access id>
AWS Secret Access     [None]: <secret>
Default region name   [None]: <press enter>
Default output format [None]: <press enter>
To create a new bucket:
To list your current buckets:
$ aws --profile=fuga --endpoint=<fuga_s3_endpoint> s3api list-buckets
{
    "Buckets": [
        {
            "Name": "test",
            "CreationDate": "2021-10-20T12:34:37.650Z"
        },
    ],
    "Owner": {
        "DisplayName": "owner name",
        "ID": "owner ID."
    }
}
Now you have created a new bucket with the AWS CLI tools, this one is usable with S3 and Swift.
Using the object store
Using your own application
To use your own application, it needs to be compatible with S3 or Swift (Then you have to use the application or team credentials).
To configure the object store it requires mostly 3 things:
-
The endpoint:
- This can be found in Access, then go to API Endpoints and search for S3.
-
The access key
- The access secret
Using the EC2 key pair and S3 URL the S3 object can now be accessed using any S3 client or by using one of the various libraries available. Below is a code example using the boto library in Python.
from boto.s3.key import Key
import boto
import boto.s3.connection

access_key = '99999999999999999999999999999999'
secret_key = '99999999999999999999999999999999'
filename = 'test.txt'

conn = boto.connect_s3(
aws_access_key_id = access_key,
aws_secret_access_key = secret_key,
host = '<fuga_s3_endpoint',
port = <fuga_s3_port>,
calling_format = boto.s3.connection.OrdinaryCallingFormat(),
)

bucket = conn.get_bucket('mybucket')

k = Key(bucket)
k.key = filename
k.set_contents_from_filename(filename)
k.make_public()
We will be creating a .NET core project using a template with MVC.
- Create a new folder for the .NET Core project:
- Open the folder in your terminal with the following command:
-
Create a new empty .NET Core ASP project by executing the following command:
An empty web project will be in your fugadotnet directory. -
Create a new folder inside your fugadotnet folder called Controllers:
- Create a new folder inside your fugadotnet folder called Views:
- Go inside the Views folder with the following command:
-
Inside the Views folder, create a new folder called ObjectStore.
Enter the following command:
This is the name of the controller that we will create in the next chapter, feel free to change this. -
Open this project in your favorite IDE or text editor, for example, Visual Code or Atom.
Adding the AWS .NET S3 SDK to your project
The Fuga Object Store is Amazon S3 compatible, that’s why we can use the official Amazon SDK. We will be installing the AWS S3 SDK package to our .NET Core project.
- In your terminal execute the following command in your project root:
Creating a new Controller
We will be creating a Controller, this will contain most of the logic for the Object Store.
- Inside your Controllers folder, create a new file called ObjectStoreController.cs within your text editor or with the following command:
- Open the ObjectStoreController.cs with your text editor and paste in the following code:
using System; using Microsoft.AspNetCore.Mvc; using System.IO; using Amazon.S3; using Amazon.S3.Model; using System.Threading.Tasks; using Microsoft.AspNetCore.Http; namespace fugadotnet.Controllers { public class ObjectStoreController : Controller { private string container = "YOUR_CONTAINER_NAME_HERE"; private AmazonS3Client fuga = Startup.GetS3Client(); public IActionResult Index() { return View(); } [HttpPost] public IActionResult Index(string name) { if (HttpContext.Request.Form.Files != null) { var files = HttpContext.Request.Form.Files; foreach (var file in files) { Console.WriteLine(file.FileName); if (file.Length > 0) { UploadObjectToObjectStore(file); } } } return View(); } public IActionResult Get([FromQuery(Name = "name")] string name) { ViewData["content"] = GetObject(name).Result; return View(); } async Task<string> GetObject(string name) { GetObjectRequest request = new GetObjectRequest { BucketName = container, Key = name }; using (GetObjectResponse response = await fuga.GetObjectAsync(request)) using (Stream responseStream = response.ResponseStream) using (StreamReader reader = new StreamReader(responseStream)) { return reader.ReadToEnd(); } } async Task UploadObjectToObjectStore(IFormFile file) { var result = string.Empty; using (var reader = new StreamReader(file.OpenReadStream())) { result = reader.ReadToEnd(); } var request = new PutObjectRequest { BucketName = container, Key = file.FileName, ContentBody = result }; await fuga.PutObjectAsync(request); } } } - Inside your ObjectStoreController.cs, edit the container variable to your container name.
- Save the file.
Creating the views
- Inside your fugadotnet/Views/ObjectStore folder, create two views with the following command:
- Open Index.cshtml with your text editor and paste in the following:
<h1>Fuga Object Store file upload</h1> <form method="post" enctype="multipart/form-data" asp-controller="ObjectStore" asp-action="Index"> <div class="form-group"> <div class="col-md-10"> <p>Upload one or more files using this form:</p> <input type="file" name="files" multiple /> </div> </div> <div class="form-group"> <div class="col-md-10"> <input type="submit" value="Upload" /> </div> </div> </form> - Save the file.
- Open Get.cshtml and paste in the following:
- Save the file.
Attaching our controller to the project and initializing the connection
Before
- Open the Startup.cs file located in the project root and paste in the following:
using System; using System.Collections.Generic; using System.Linq; using System.Threading.Tasks; using Amazon.Runtime; using Amazon.S3; using Microsoft.AspNetCore.Builder; using Microsoft.AspNetCore.Hosting; using Microsoft.AspNetCore.Http; using Microsoft.AspNetCore.HttpsPolicy; using Microsoft.AspNetCore.Mvc; using Microsoft.Extensions.Configuration; using Microsoft.Extensions.DependencyInjection; namespace fugadotnet { public class Startup { private static AmazonS3Client client; public Startup(IConfiguration configuration) { Configuration = configuration; AmazonS3Config config = new AmazonS3Config(); config.ServiceURL = "<fuga_s3_endpoint>"; config.ForcePathStyle = true; config.SignatureVersion = "2"; BasicAWSCredentials cred = new BasicAWSCredentials($"{Configuration["AccessKey"]}", $"{Configuration["SecretKey"]}"); client = new AmazonS3Client(cred, config); } public static AmazonS3Client GetS3Client() { return client; } public IConfiguration Configuration { get; } public void ConfigureServices(IServiceCollection services) { services.AddMvc().SetCompatibilityVersion(CompatibilityVersion.Version_2_1); } public void Configure(IApplicationBuilder app, IHostingEnvironment env) { if (env.IsDevelopment()) { app.UseDeveloperExceptionPage(); } app.UseMvc(routes => { routes.MapRoute( name: "default", template: "{controller=ObjectStore}/{action=Index}/{id?}"); }); } } } - Save the file.
Configuring access to your Fuga Object Store container
- In your project root, create a new file called
appsettings.json: - Copy paste in the following settings:
- Replace the
YOUR_ACCESS_KEYandYOUR_SECRET_KEYwith the correct data. - Save the file.
Testing the application
- Run the application by executing the following command inside your project root folder:
- Your web browser will show you a file upload page.
- Upload a text file, for example, test.txt with Hello, World as content.
- Browse to https://localhost:5001/ObjectStore/Get?name=test.txt
Hello, World will be displayed.
Mount the object store as a file system
If you are using Linux we can mount the Object Store using s3fs. With MacOS and Windows, we can use Cyberduck to connect to the Object Store.
This section shows you how to mount your Fuga object storage to your instance, this allows you to use your object storage like a volume.
- SSH into your instance or open a local terminal so that we can save the credentials.
- To create a new empty file for our credentials, enter the following command:
- To open the new file in a text editor like Nano, enter the following command:
-
Paste (Ctrl + Shift + V in Nano or Vim) in your access key and secret key into the new file in the following format:
-
your_accesskey:your_secret key
Example:
9f2XXXXX36314b1eaf64XXXXX0e74e3:0541e02XXXXXc79b25b6e0XXXXX32e0
-
-
To save the file, first press Ctrl + X and if asked to save changes press ‘Y’. When asked for a filename to write, simply press enter.
- After saving our keys we should change the file permissions of this file to 600. Execute the following command:
Installing s3fs
- SSH into your instance or open a local terminal
- To install the required packages run the following command:
- Before we can actually mount our Fuga Object Store container we first need to create a mounting point. For this tutorial, we will just mount the container to the standard /mnt. Start by creating an empty folder:
-
To make our container mount automatically we can edit the fstab file. Open the fstab file with our favorite editor:
- Add the following line in your fstab file, make sure to replace YOUR_CONTAINER with the name of your container that you created on the Fuga dashboard:
- To save the file, first press Ctrl + X and if asked to save changes press ‘Y’. When asked for a filename to write, simply press enter.
-
To instantly mount your object storage enter the following command:
- You can find your Object Store at the mount point /mnt.
Now you’re done configuring your Fuga Object Store in Linux!
Fuga object storage is compatible with Amazon S3. Chances are, your favorite S3 client supports the Object Store. In this tutorial, we’re using the open source Cyberduck client. To connect to the Object Store we need some data:
The Fuga S3 URL: https://core.fuga.cloud:8080
The Access Key and the Secret Key we created or listed in the first paragraph
Next, create a new connection in Cyberduck. Select Amazon S3 and fill out the Server (S3 URL, without https:// and without 8080), poort: 8080, Username (Access Key) and Password (Secret Key) and click connect.
That’s it. You should be able to see your containers. You can now drag and drop items to and from containers in your object store.
Enjoy working with the object store!