How to setup an extra port with Netplan
Estimated time to read: 3 minutes
This tutorial will teach you how to setup an extra port with IPv4 or IPv6 using Netplan.
Introduction
Some operating systems will automatically detect a new interface and assigns a new IP through DHCP (if possible) others have to be manually configured.
This tutorial will show how to configure it manually for certain operating systems.
Prerequisites
- Fuga Cloud Account
- An SSH key is known by the Fuga Cloud API
- A compute instance
- A second port, IPv4 / IPv6 based, connected to your instance
When a compute instance is created with an extra port, this one is already configured.
Step 1: Check if the port is added to your machine
Some operating systems (OS) will not automatically recognize an added virtual interface port (VIP). It’s important to check if the chosen OS has the new assigned VIP.
- Log into your instance with your SSH key
- Fill in the next command:
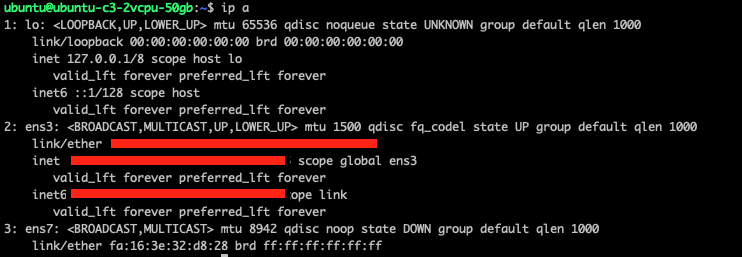
Interface naming
The VIP name can be different on your system, in this example above it's possible to see 'ens3' and 'ens7'. In your case, for example, this could be 'ens2' and 'ens5'.
In the above output you see two VIPs:
- The port "ens3" has an IPv4 address assigned.
- The port "ens7" has nothing assigned.
This means that the VIP has not been set up.
Step 2: configure the extra port
To configure the extra port, the config file of Netplan has to be changed. A normal configuration of Netplan should look like this:
network:
  version: 2
  ethernets:
    ens3:
      addresses:
      - 10.1.1.162/23
      match:
        macaddress: fa:fa:fa:ee:31:fa
      mtu: 1500
      nameservers:
        addresses:
        - 8.8.4.4
        - 8.8.8.8
        search: []
      set-name: ens3
Open the configuration file with:
nano /etc/netplan/50-cloud-init.yaml
For DHCP, (the IP address will get automatically assigned) add the following extra lines for ens7 (ens7 is in our example the extra VIP):
Routing all traffic
For routing all trafic over this port: routes:
For static, (you will assign the IP) add the following extra lines for ens7 (ens7 is in our example the extra VIP):
Step 3: Check the configuration and apply it
To check if the configuration is correct we execute the following:
If there is an error, Netplan will give an error message. If there is no error it will apply the current settings. After applying, check if the applications running on your machine are still working and click ENTER to apply the configuration.
If the timer runs out (120 seconds) it will revert the settings back to the previous configuration if possible. To apply the settings:
Step 4: Check if the port has an IP address assigned
When you run the command ip a again the IP address will show up in ens7.
Conclusion
After you followed this tutorial you have configured a port to have an IPv4 address assigned through DHCP or a static configuration or an IPv6 address.