How to set up a private network between two instances
Estimated time to read: 3 minutes
In this tutorial, we explain step by step how to set up a private network within OpenStack between two instances.
Introduction
When you use multiple instances that have to communicate with each other, you want to do this in the most secure way; let them communicate with each other through a private network instead from the outside.
Fuga Cloud offers with OpenStack an easy way to create a private network between your instances.
In this tutorial, you learn how to set up the Private network that can be used to talk locally to another instance.
Prerequisites
For this tutorial you'll need the following:
- A Fuga Cloud account
- Knowledge of security groups
- (Optional) 2 compute instances
Step 1: setup an internal network
- Go to your dashboard
- Click on the Networking tab and select Networks
- Create a new network
- Enter a network name:
<my private network> - (Optional) enter a description:
- Select Creating a subnetwork
- Enter a subnet name:
<my private subnet> - Fill in a subnet range, like:
192.168.0.0/24 - Select IPv4
- Disable the Gateway option
- Enter a subnet name:
- Enter a network name:
Step 2: assign the internal network to an instance
Note: If the instance is not yet created, follow our tutorial about directly attaching them to an IPv4 / IPv6, but select then your private network to.
- Go to your dashboard
- Click on the Compute tab and select Instances
- Click on an instance you want to connect to the private network
- Select the 3 dots:
- Click on the add a port
- Select by network
- Select the created private network
- (Optional) assign a static IP to the instance
Step 2a:
Note: It can take a minute for the instance to recognize the added VIP.
Some operating systems (OS) will not automatically recognize an added virtual interface port (VIP). It’s important to check if the chosen OS has the new assigned VIP.
- Log into your instance with your SSH key
- Fill in the next command:
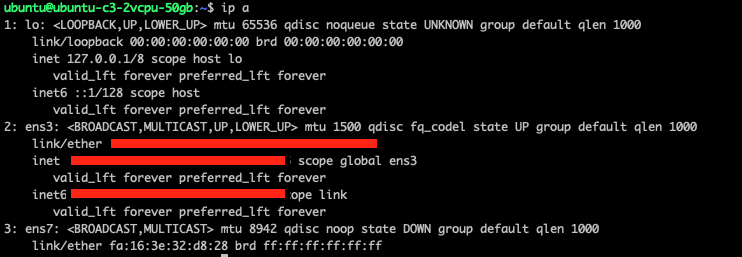
In the above output, you see two VIPs, one has an IP and the other none. This means that the VIP is not set up, with DHCP or static IP for that VIP.
This has to be done manually inside your instance. See "How to setup an extra port (IPv4) with Netplan" about adding an IP address to a VIP.
Step 3: Configure the security group settings
Each port within an instance has security groups. By default, this is ‘default’ (this one should not be edited).
- Create a new security group. (see our tutorial "How to use Security Groups to tighten security" about security groups)
- Set up the permissions for your network (firewall rules)
- Assign the security group to the port on the instances of your private network.
- Go into your instance
- Browse to the ports and select the port that has the internal network connected
- Add the ‘new’ security group
- (Optional) delete the ‘default’ security group
Conclusion
After you followed this tutorial you have interconnected at least two instances to talk over a private network you just created.