How to create a default web security group for IPv4 and IPv6
Estimated time to read: 3 minutes
In this tutorial, you will learn how to make your instance available through ipv4 and ipv6 with security groups.
Prerequisites
For the this tutorial you need the following:
- An active Fuga Cloud account.
Use case
By default, the security group blocks all incoming traffic. To allow traffic to your instance you have to allow a specific IP or range of IP addresses. In the Fuga dashboard incoming traffic is called ingress. Out going traffic egress.
To allow ingress web traffic to your instance you have to allow traffic over port 80 and 443. In the following steps we explain how to set up your security group for web traffic for IPv4 and IPv6.
Step 1 - Create a security group
Login to the Fuga dashboard, select 'networking' at the left-hand side, and to 'security group'. Here you have an overview of all your security groups. A security group acts as a virtual firewall and is a container with a set of IP filter rules which specifies what traffic has access to which port.
Click on 'Create security group' and a new window will appear, give your new security group a name, and click on 'Create security group'.
Step 2 - Give the security group the default web rules.
Create web security for IPv4
- Click on 'Add rule'
- Select below 'Direction' Ingress
- Select below 'Open Port' the option Port
- Select below 'Port' type 80 (HTTP).
- Keep CIDR as it is, with the IPv4 range of 0.0.0.0/0
- Click on 'Create rule'
Repeat the steps again and create a second security rule for port 443 (HTTPS). Create web security for IPv6
- Click on 'Add rule'
- Select below 'Direction' Ingress
- Select below 'Open Port' the option Port
- Select below 'Port' type 80 (HTTP).
- Keep CIDR as it is, with the IPv6 range of ::/0
- Click on 'Create rule'
Repeat this steps for port 443 (HTTPS).
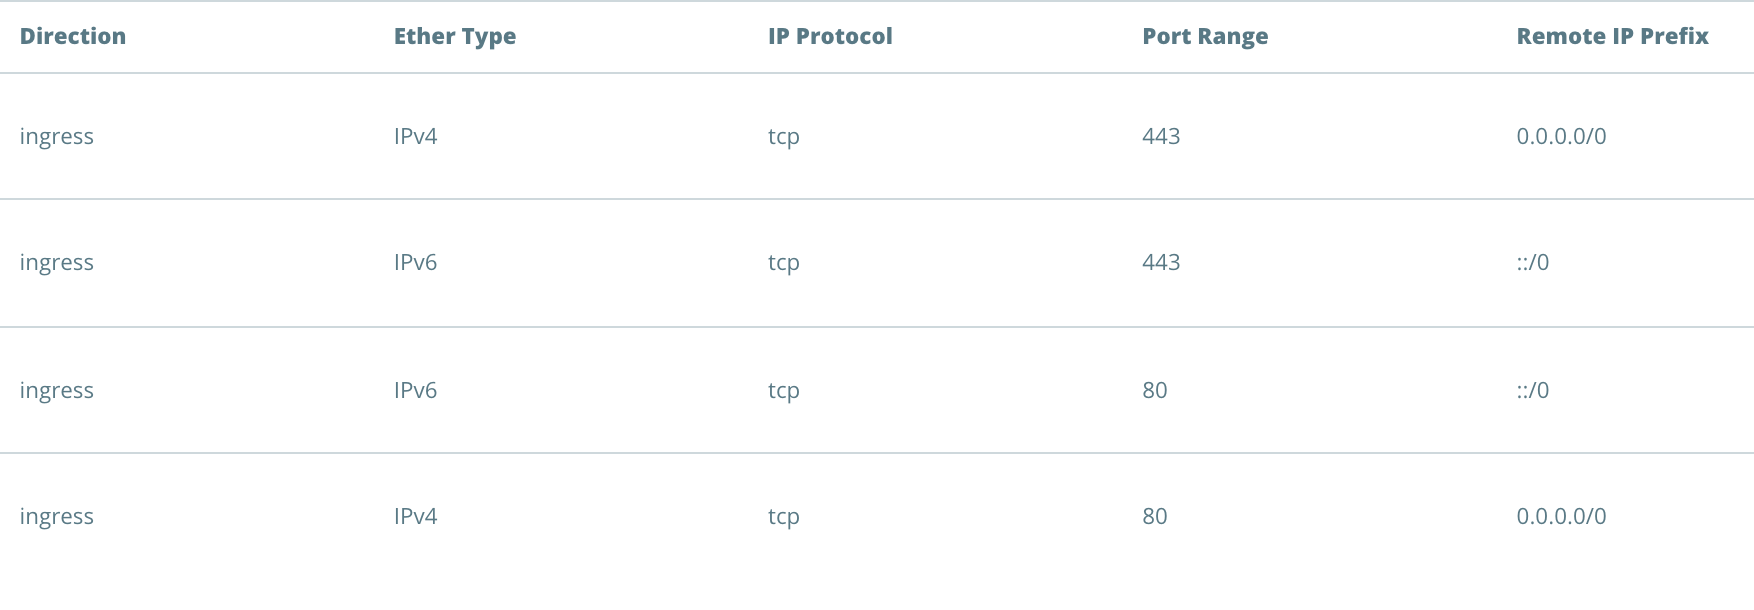
As a result, you have added a total of four rules in your security group:
Step 3 - Understanding CIDR
CIDR is a pool that filters the IP-addresses that may visit the instance.
-
IPv4
-
With a 0.0.0.0/0 range, you allow all IPv4 traffic to visit the server.
-
When entering 192.168.0.10/32 you only allow one specific IPv4-address using the subnet of /32.
-
-
IPv6
-
With a ::/0 range, you allow all IPv6 traffic to visit the server
-
When entering 2001:ACED:AC20::1337/128 you only allow one specific IPv6-address using the subnet of /128.
-
Step 4 - Attach the security group to your instance
- Go to compute > Instance.
- Select the instance you want to add the security group with.
- Scroll down till you reached the had Security groups.
- Click on the Plus '+'.
- Choose the security group you have created below 'Add security group'
- Click on the check mark to confirm.
The security group is now attached to your instance.
Conclusion
In this tutorial, you have learned how to create a default web security group for IPv4 and IPv6, this allows your instance to support IPv4 and IPv6 traffic.