EMK - Create a Kubernetes cluster
Estimated time to read: 8 minutes
In this tutorial you learn how to create your Kubernetes cluster through the GUI, kubectl or Terraform.
Creating an EMK Cluster is straightforward and involves just a few simple steps.
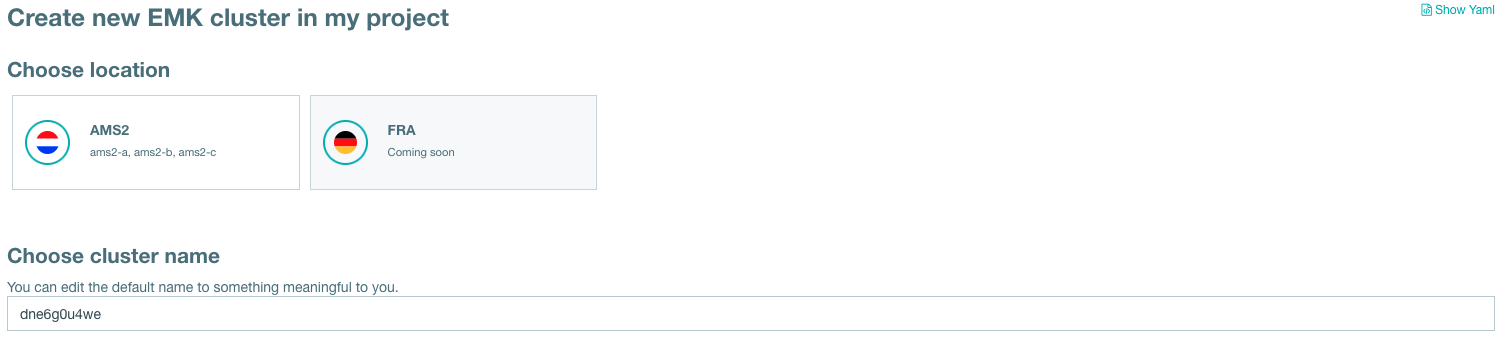
- (Optional) give your cluster a name
-
Select your Kubernetes version > We offer various versions of Kubernetes and are working hard to always offer the latest Minors and Patches.

-
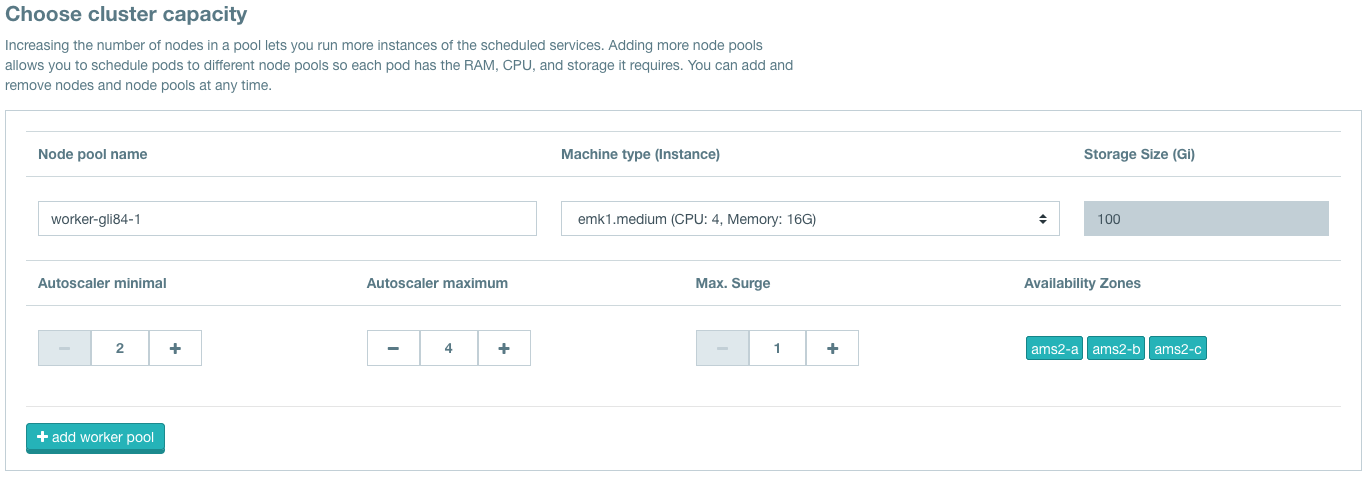
Configure your worker pool(s)
- (Optional) give it a name
- Choose a Machine type (Instance flavor)
-
Setup autoscaler minimum
These are the minimum nodes your cluster will run with.
-
Setup autoscaler maximum
These are the maximum nodes your cluster can run with.
-
Setup maximum surge
This is the maximum number of nodes that will scale down, at a time, when they are not required anymore.
-
(Optional) configure DNS for your EMK Cluster. (This requires a DNS (sub)zone in Fuga Cloud).

-
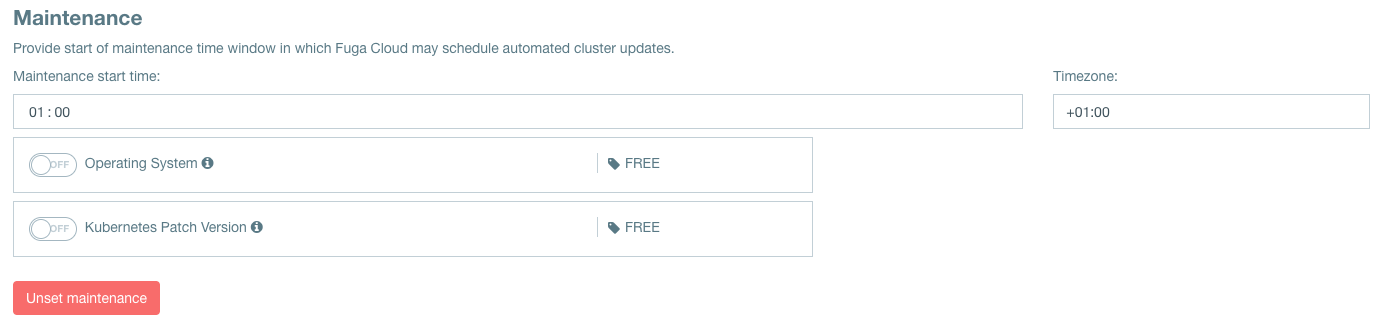
Configure your maintenance window
- Set the start time of the maintenance window
- Set your timezone for the time selected in step A
- Toggle if there may be Operating System updates
- Toggle if there may be Kubernetes Patch updates
-
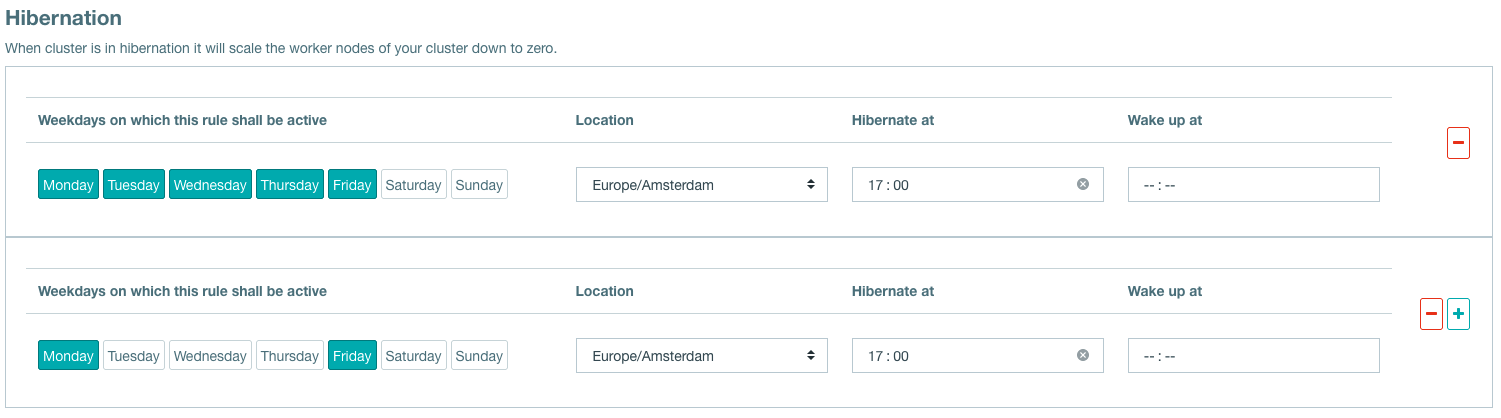
(Optional) Configure hibernation of your EMK Cluster
- Select the days for hibernation
- Set wake up time
- Set hibernate at time
At the bottem of the page you can find the total minimum and total maximum cost of your configured cluster. Keep in mind that with auto scaling the costs can change between those two numbers. Making use of PVC's, extra IP's and loadbalancers can increase the price, as the stated price is an indication range for the selected worker pools.

Please wait while your cluster comes online. You can view all your created clusters on the EMK Cluster overview page.
Requirements:
- Kubectl, installation instructions can be found here.
- Service Account (SA), how to get one; See here.
Step 1: Create a cluster
To create an EMK cluster with kubectl a yaml configuration is required. Place the configuration in shoot-config.yaml. You can find a basic config below.
To create the cluster, run the following command:
% kubectl apply -f shoot-config.yaml \
    --kubeconfig emk-sa-kubeconfig.yaml
shoot.core.gardener.cloud/yih8z7wkv6 created
Congratulations! You have made your first EMK cluster through the command line.
Step 2: Describe the cluster
Verify the state of your EMK cluster. Before requesting a kubeconfig to your cluster it has to be in a finished state.
% kubectl get shoots
    --kubeconfig emk-sa-kubeconfig.yaml
NAME         PROVIDER   K8S VERSION  LAST OPERATION           STATUS      AGE
my-cluster   openstack  1.28.9       Create Processing (26%)  healthy     2m
Information about accessing the cluster can be found here.phot
Requirements:
- Terraform, installation instructions can be found here.
- Service Account (SA), how to get one; See here.
This Terraform guide assumes the creation of clusters through kubectl. For this we use the kubectl Terraform Provider.
Step 1: Setup Terraform
Create an empty working directory for this guide. In the newly created directory create a file called versions.tf with the following content:
terraform {
  required_version = ">= 0.13"

  required_providers {
    kubectl = {
      source  = "gavinbunney/kubectl"
      version = ">= 1.7.0"
    }
  }
}
terraform init.
Step 2: Link your Service Account
The kubectl Terraform Provider needs to communicate with our system. We will do this with the Service Account kubeconfig.
Create a file called fuga_emk.tf with the following content:
Step 3: Defining the Kubernetes cluster
Terraform is now setup and configured correctly. It is possible to communicate with Fuga EMK and the next step is to deploy a Kubernetes cluster.
Create a file called cluster.tf with the following content:
cluster.yaml. In cluster.yaml the cluster configuration is placed. You can find a basic config below.
Step 4: Creating a cluster
After executing all steps above, you are now ready to deploy your cluster.
Open up a shell in the newly created directory with all the above created files and initialize Terraform with:
❯ terraform init

Initializing the backend...

Initializing provider plugins...
- Finding gavinbunney/kubectl versions matching ">= 1.7.0"...
- Installing gavinbunney/kubectl v1.14.0...
- Installed gavinbunney/kubectl v1.14.0 (self-signed, key ID AD64217B5ADD572F)

Partner and community providers are signed by their developers.
If you'd like to know more about provider signing, you can read about it here:
https://www.terraform.io/docs/cli/plugins/signing.html

Terraform has created a lock file .terraform.lock.hcl to record the provider
selections it made above. Include this file in your version control repository
so that Terraform can guarantee to make the same selections by default when
you run "terraform init" in the future.

Terraform has been successfully initialized!

You may now begin working with Terraform. Try running "terraform plan" to see
any changes that are required for your infrastructure. All Terraform commands
should now work.

If you ever set or change modules or backend configuration for Terraform,
rerun this command to reinitialize your working directory. If you forget, other
commands will detect it and remind you to do so if necessary.
Afterward, you generate a "terraform plan" which evaluates the .tf configurations you previously set up. It verifies their accuracy, ensures all necessary components are included, and detects any syntax errors.
❯ terraform plan

Terraform used the selected providers to generate the following execution plan.
Resource actions are indicated with the following symbols:
  + create

Terraform will perform the following actions:

  # kubectl_manifest.my_first_cluster will be created
  + resource "kubectl_manifest" "my_first_cluster" {
      + api_version             = "core.gardener.cloud/v1beta1"
      + apply_only              = false
      + force_conflicts         = false
      + force_new               = false
      + id                      = (known after apply)
      + kind                    = "Shoot"
      + live_manifest_incluster = (sensitive value)
      + live_uid                = (known after apply)
      + name                    = "my-cluster"
      + namespace               = "garden-<project_name>"
      + server_side_apply       = false
      + uid                     = (known after apply)
      + validate_schema         = true
      + wait_for_rollout        = true
      + yaml_body               = (sensitive value)
      + yaml_body_parsed        = <<-EOT
            apiVersion: core.gardener.cloud/v1beta1
            kind: Shoot
            metadata:
              name: my-cluster
              namespace: garden-<project_name>
            spec:
              cloudProfileName: fugacloud
              hibernation:
                schedules: []
              kubernetes:
                enableStaticTokenKubeconfig: false
                version: 1.28.9
              maintenance:
                autoUpdate:
                  kubernetesVersion: true
                  machineImageVersion: true
                timeWindow:
                  begin: 010000+0100
                  end: 020000+0100
              networking:
                nodes: 10.250.0.0/16
                type: calico
              provider:
                controlPlaneConfig:
                  apiVersion: openstack.provider.extensions.gardener.cloud/v1alpha1
                  kind: ControlPlaneConfig
                  loadBalancerProvider: amphora
                infrastructureConfig:
                  apiVersion: openstack.provider.extensions.gardener.cloud/v1alpha1
                  floatingPoolName: public
                  kind: InfrastructureConfig
                  networks:
                    workers: 10.250.0.0/16
                type: openstack
                workers:
                - cri:
                    name: containerd
                  machine:
                    image:
                      name: gardenlinux
                      version: 1312.3.0
                    type: emk1.medium
                  maxSurge: 1
                  maximum: 4
                  minimum: 2
                  name: worker-group-1
                  zones:
                  - ams2-a
                  - ams2-b
                  - ams2-c
              purpose: production
              region: ams2
              secretBindingName: emk-project-<secret-binding>
        EOT
      + yaml_incluster          = (sensitive value)
    }

Plan: 1 to add, 0 to change, 0 to destroy.

─────────────────────────────────────────────────────────────────────────────

Note: You didn't use the -out option to save this plan, so Terraform can't
guarantee to take exactly these actions if you run "terraform apply" now.
If everything's set up right, it'll show that it's going to create the Kubernetes cluster with the settings you provided. If you're okay with that, just type terraform apply. It'll list all the things it's going to do, and typing yes will start it. If you're really sure and don't want to confirm, you can add -auto-approve to the command, but be careful.
❯ terraform apply

Terraform used the selected providers to generate the following execution plan.
Resource actions are indicated with the following symbols:
  + create

Terraform will perform the following actions:

  # kubectl_manifest.my_first_cluster will be created
  + resource "kubectl_manifest" "my_first_cluster" {
      + api_version             = "core.gardener.cloud/v1beta1"
      + apply_only              = false
      + force_conflicts         = false
      + force_new               = false
      + id                      = (known after apply)
      + kind                    = "Shoot"
      + live_manifest_incluster = (sensitive value)
      + live_uid                = (known after apply)
      + name                    = "my-cluster"
      + namespace               = "garden-<project_name>"
      + server_side_apply       = false
      + uid                     = (known after apply)
      + validate_schema         = true
      + wait_for_rollout        = true
      + yaml_body               = (sensitive value)
      + yaml_body_parsed        = <<-EOT
................................
        EOT
      + yaml_incluster          = (sensitive value)
    }

Plan: 1 to add, 0 to change, 0 to destroy.

Do you want to perform these actions?
  Terraform will perform the actions described above.
  Only 'yes' will be accepted to approve.

  Enter a value: yes

kubectl_manifest.my_first_cluster: Creating...
kubectl_manifest.my_first_cluster: Creation complete after 0s
[id=/apis/core.gardener.cloud/v1beta1/namespaces/garden-<project_name>/shoots/my-cluster]

Apply complete! Resources: 1 added, 0 changed, 0 destroyed.
If you don't see any errors, the cluster creation has begun. Congratulations! You have made your first EMK cluster through the command line. Now, you can head over to the Fuga dashboard and track the progress until the creation is finished or use kubectl through the command line to see the progress of the cluster creation.
Basic cluster configuration
For a basic example of a cluster configuration click on "Show YAML" in the upper right corner at my.fuga.cloud or view the snippet below.
Filling in the gaps from the basic configuration:
-
<project_name>atmetadata.namespace.The project name can be found in the dashboard or in the Service Account kubeconfig at
contexts[0].context.namespace. -
<secret-binding>atspec.secretBindingName.You can get the secret binding with the following:
% kubectl get secretbindings \
    --kubeconfig emk-sa-kubeconfig.yaml | grep emk-project
NAME               SECRET                               PROVIDER              AGE
my-secretbinding   garden-emkproject/my-secretbinding   openstack             95d
This secret binding can be filled in on the spot:
<my-secretbinding>.
Basic cluster YAML
To ensure your setup is ready for production usage, it's best not to simply copy the basic configuration."
apiVersion: core.gardener.cloud/v1beta1
kind: Shoot
metadata:
  namespace: garden-<project_name>
  name: my-cluster
spec:
  provider:
    type: openstack
    infrastructureConfig:
      apiVersion: openstack.provider.extensions.gardener.cloud/v1alpha1
      kind: InfrastructureConfig
      networks:
        workers: 10.250.0.0/16
      floatingPoolName: public
    controlPlaneConfig:
      apiVersion: openstack.provider.extensions.gardener.cloud/v1alpha1
      kind: ControlPlaneConfig
      loadBalancerProvider: amphora
    workers:
    - name: worker-group-1
      minimum: 2
      maximum: 4
      maxSurge: 1
      zones:
      - ams2-a
      - ams2-b
      - ams2-c
      cri:
      name: containerd
      machine:
      type: emk1.medium
      image:
        name: gardenlinux
        version: 1312.3.0
      labels: {}
  cloudProfileName: fugacloud
  kubernetes:
    version: 1.28.9
    enableStaticTokenKubeconfig: false
  hibernation:
    schedules: []
  secretBindingName: <secret-binding>
  networking:
    nodes: 10.250.0.0/16
    type: calico
  maintenance:
    timeWindow:
      begin: 010000+0100
      end: 020000+0100
    autoUpdate:
      machineImageVersion: true
      kubernetesVersion: true
  purpose: production
  region: ams2